Software
The Cura plugin
Cura follows the roll in the deck, shows the deck in a tab, and prints on a part that is printed already.
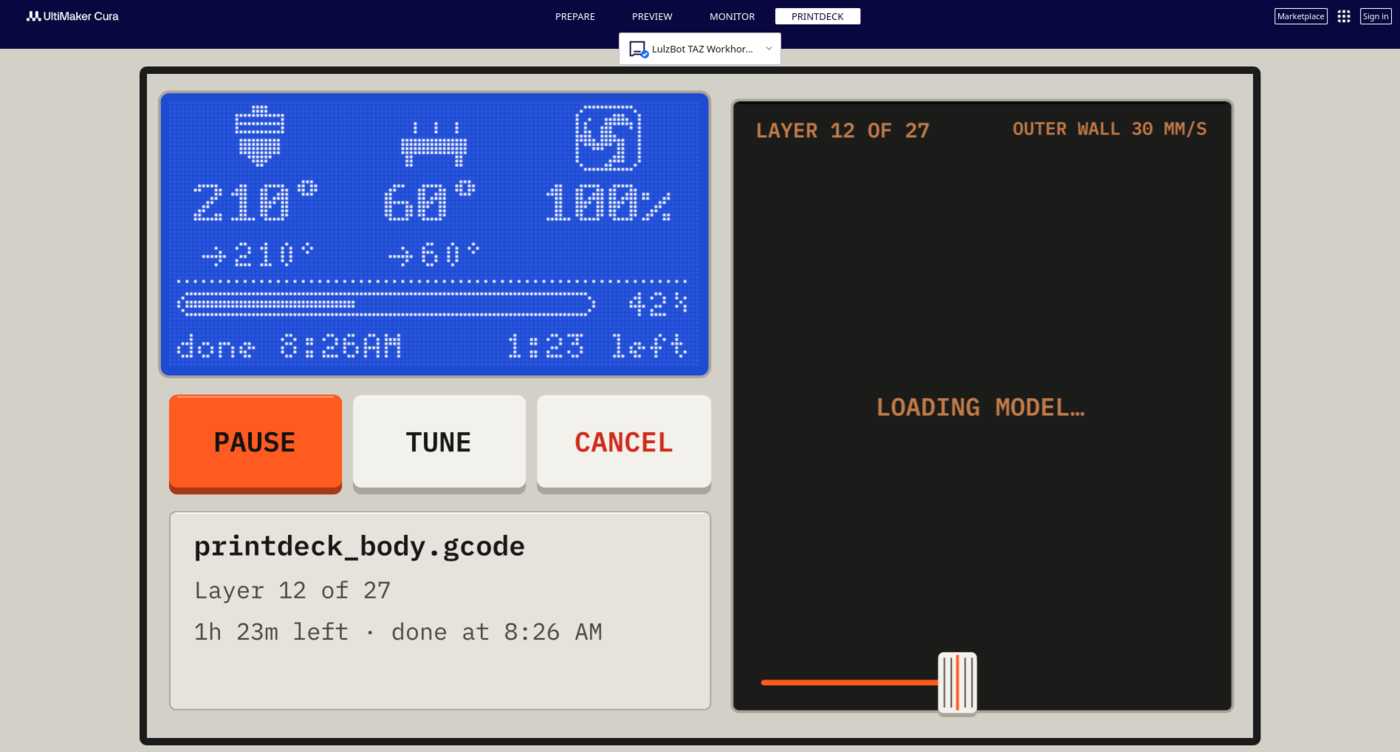
The booklet has the setup and each feature, with pictures: on the web, or docs/cura/printdeck-cura.pdf.
Install
The plugin needs Cura 5. Cura LulzBot Edition (Cura 4.13) shows no Printdeck tab and no Print on a part tool.
- Install the OctoPrint connection plugin from the Marketplace of Cura, and connect it to the Printdeck.
- Download
Printdeck.curapackagefrom the latest release, and drag it onto the Cura window. - Restart Cura.
The plugin uses the address and the API key of the OctoPrint connection. It needs no setup.
What it does
- The print button is "Print to Printdeck".
- Cura changes to the material of the roll in the Printdeck.
- Each roll is a favorite material in Cura, with its name, color, price and weight.
- After a slice, Cura warns when the roll is too short for the model.
- A card next to the slice button shows the roll and the filament left.
- After a slice, Cura shows the print time from the Printdeck, with the start macro.
- The Printdeck tab, next to Monitor, shows the deck screen with Pause, Resume and Cancel.
- Show in Preview, in the Printdeck tab, opens the file of the print in the Preview.
- During a print, the Preview shows the layer that prints. Play moves the nozzle of the Preview with the printer.
- Before the Printdeck prints a file for another material, it asks on the touch screen.
- The deck shows the name of the print, for example "Hex planter" in place of "TAZWH_hex_planter_v3.gcode": the job name without the printer prefix, or the name of the one model on the build plate.
- The Project box on the roll card puts the next prints in a project of the deck. Pick a project from the list. The deck puts the print in the project at its start. A project that you pick on the deck wins. The choice stays until Cura closes.
Colors
The Colors tool (the left toolbar of Prepare) prints a model in the filament of another roll, with one nozzle. For example, raised letters on a part:
- Put the part on the plate, and the letters on its top.
- Select the letters, open the Colors tool, and tap the roll of the letters.
- Print. At the first layer of the letters, the printer pauses and parks the nozzle.
- Tap Change filament on the deck, change the filament, then tap Resume.
On Resume, the deck draws a 40 mm prime line at the front of the bed, then goes back to the part. The prime_* options of [printdeck_pause] set the place, the length and the height of the line.
When other models continue above the colored ones, the printer pauses again for the first roll.
Print on a part
The Print on a part tool (the left toolbar of Prepare) prints new models on a printed part, for example a logo on a lid. The part goes into a pocket on the bed. The deck checks its height with a paper test.
- Open the part and the new models. Lay the part face up, away from the front and the left edge.
- Select the part, and tap Set as base. The tool adds the pocket around the part.
- Select a new model, and tap Place on the base. Move it on the face as usual.
- For files from one assembly, tap Place as in the files.
- For lettering, type the text, its size and its height, and tap Add text.
- Print. The file prints the pocket, then pauses.
- Put the part in the pocket, and tap Check the height on the deck. Do the paper test.
- For the next color, keep the part in its pocket and check The pocket is on the bed.
While a part is the base, the tool turns off "Ensure models are kept apart". Clear the base to turn it on again.
Develop
./package.shbuildsPrintdeck.curapackage.python3 -m unittest test_logictests the parts that run with no Cura.- The Printdeck serves
GET /api/plugin/printdeck(deck/internal/octoapi/printdeck.go).
The booklet
The booklet shows the setup, the Printdeck tab, the messages and the Print on a part tool with pictures of Cura: on the web, or as a PDF. The print version printdeck-cura-print.pdf has two pages on each side of a letter sheet.