The deck UI · wide
Print a part
07Send a file from the slicer
The deck uses the OctoPrint API, so slicers can send files and start prints.
Cura: add the deck with the OctoPrint Connection plugin. The deck asks "Allow Cura to use the Printdeck?". Tap Allow.
OrcaSlicer or PrusaSlicer: add a printer of the type OctoPrint, with the address http://printdeck.local and the API key of the system page.
The webcam is the camera with the use Apps: http://printdeck.local/webcam/stream and /webcam/snapshot, with the API key. Add camera=2 for the second camera, w=320 for smaller pictures, or fps=2 for fewer frames. With no camera, the webcam shows the deck screen.
08Start a print
The newest file is at the top. Each file shows the print time, the filament and the layer height from the slicer. Cura, PrusaSlicer, OrcaSlicer and Bambu Studio write this data.
The deck shows the name of the print. The Printdeck plugin for Cura writes it in the file. For a file from another slicer, the deck removes the printer prefix and the version from the file name: TAZWH_hex_planter_v3.gcode shows as Hex planter.
- Tap Print a file on the idle screen.
- Tap the file. Check the print time, the filament and the temperatures.
- Tap Print, then Print again.
The file list
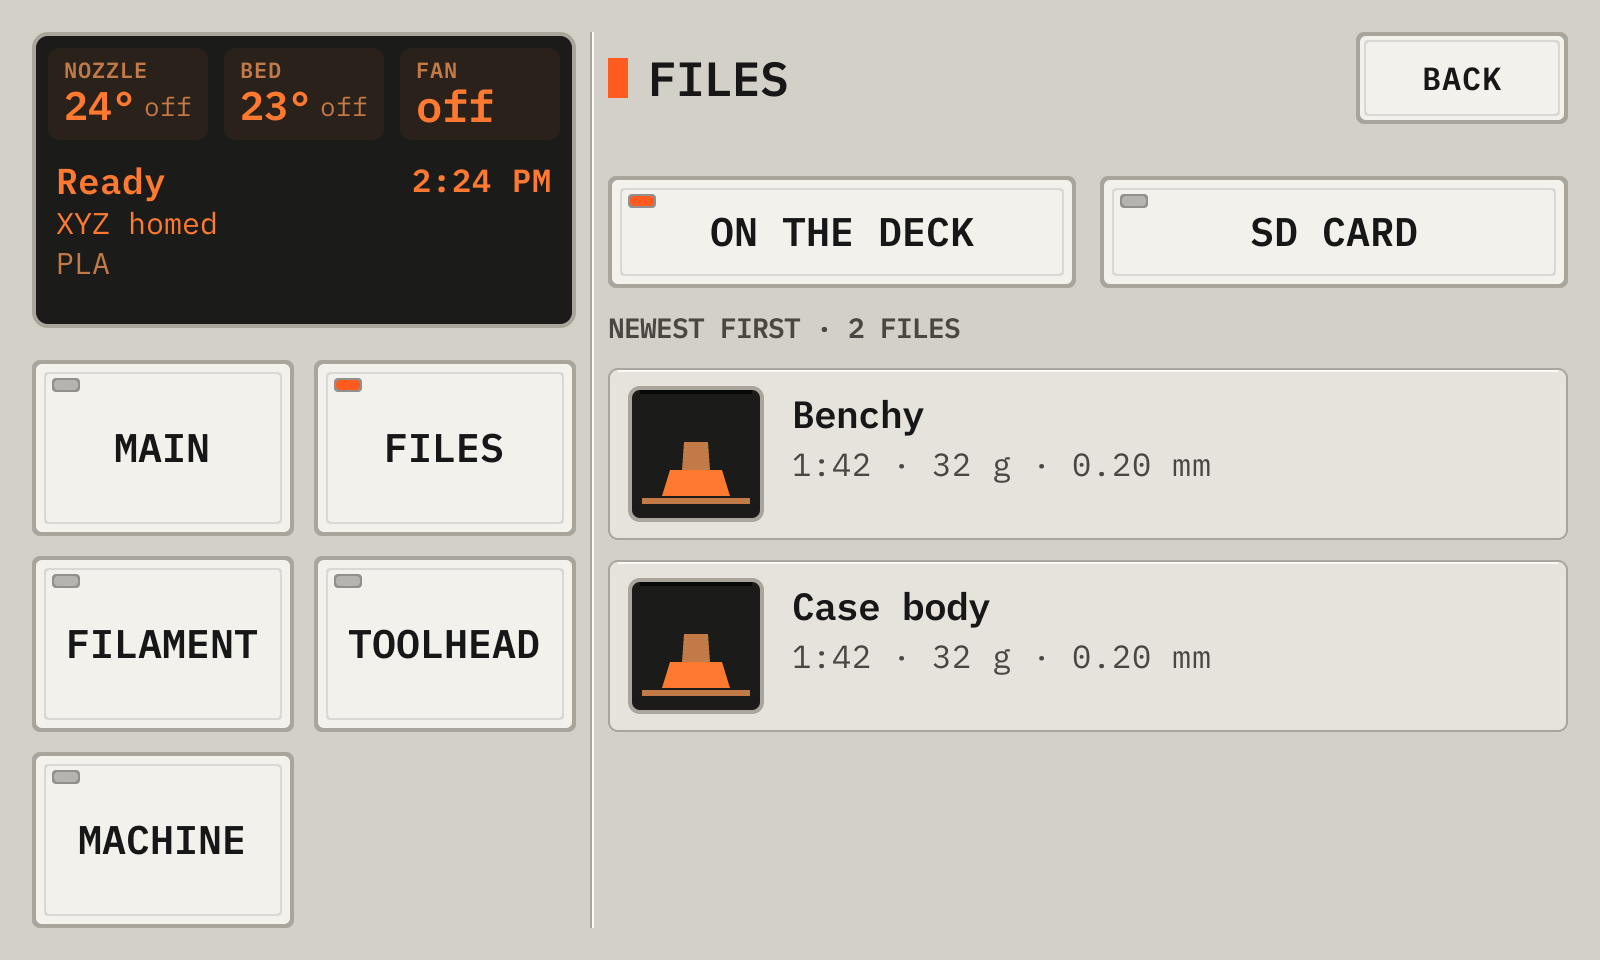
- 1CountThe number of files.
- 2PictureThe thumbnail.
- 3FileThe name of the print and the slicer data.
- 4DateWhen the file arrived.
- 5On the deck, SD cardThe files on the deck, or on the SD card of the printer display ([printdeck_sdcard]).
Tap a file to open it.
A file
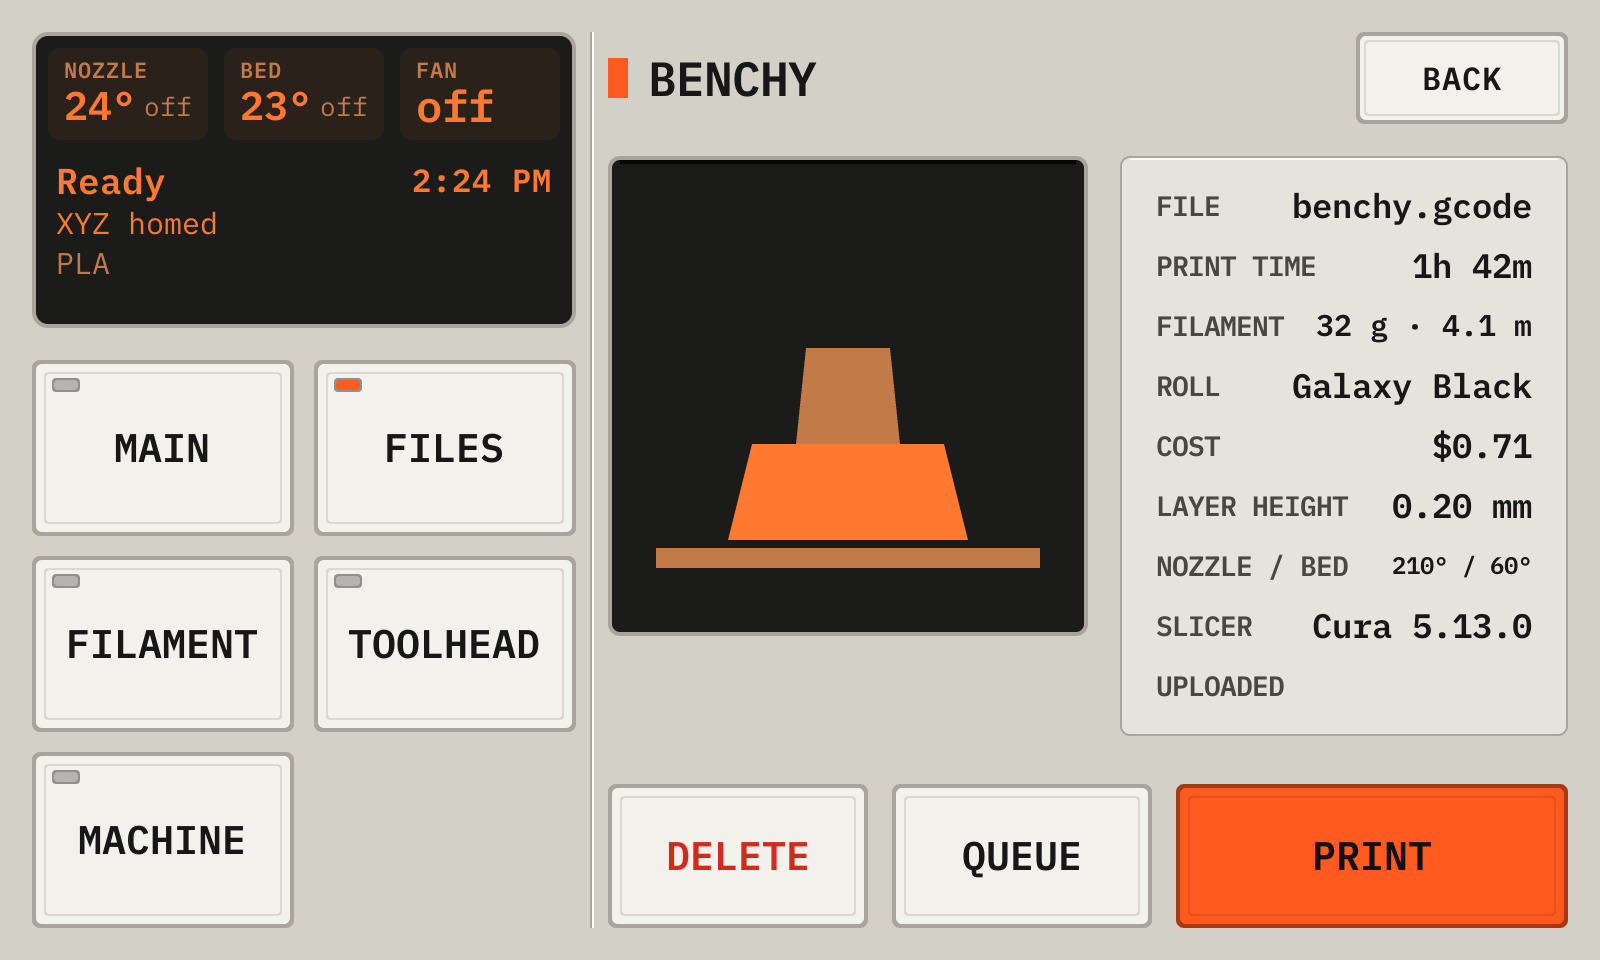
- 1PictureThe thumbnail.
- 2Slicer dataThe file name and the data from the slicer.
- 3PrintStarts the print.
- 4DeleteRemoves the file.
The SD card of the printer
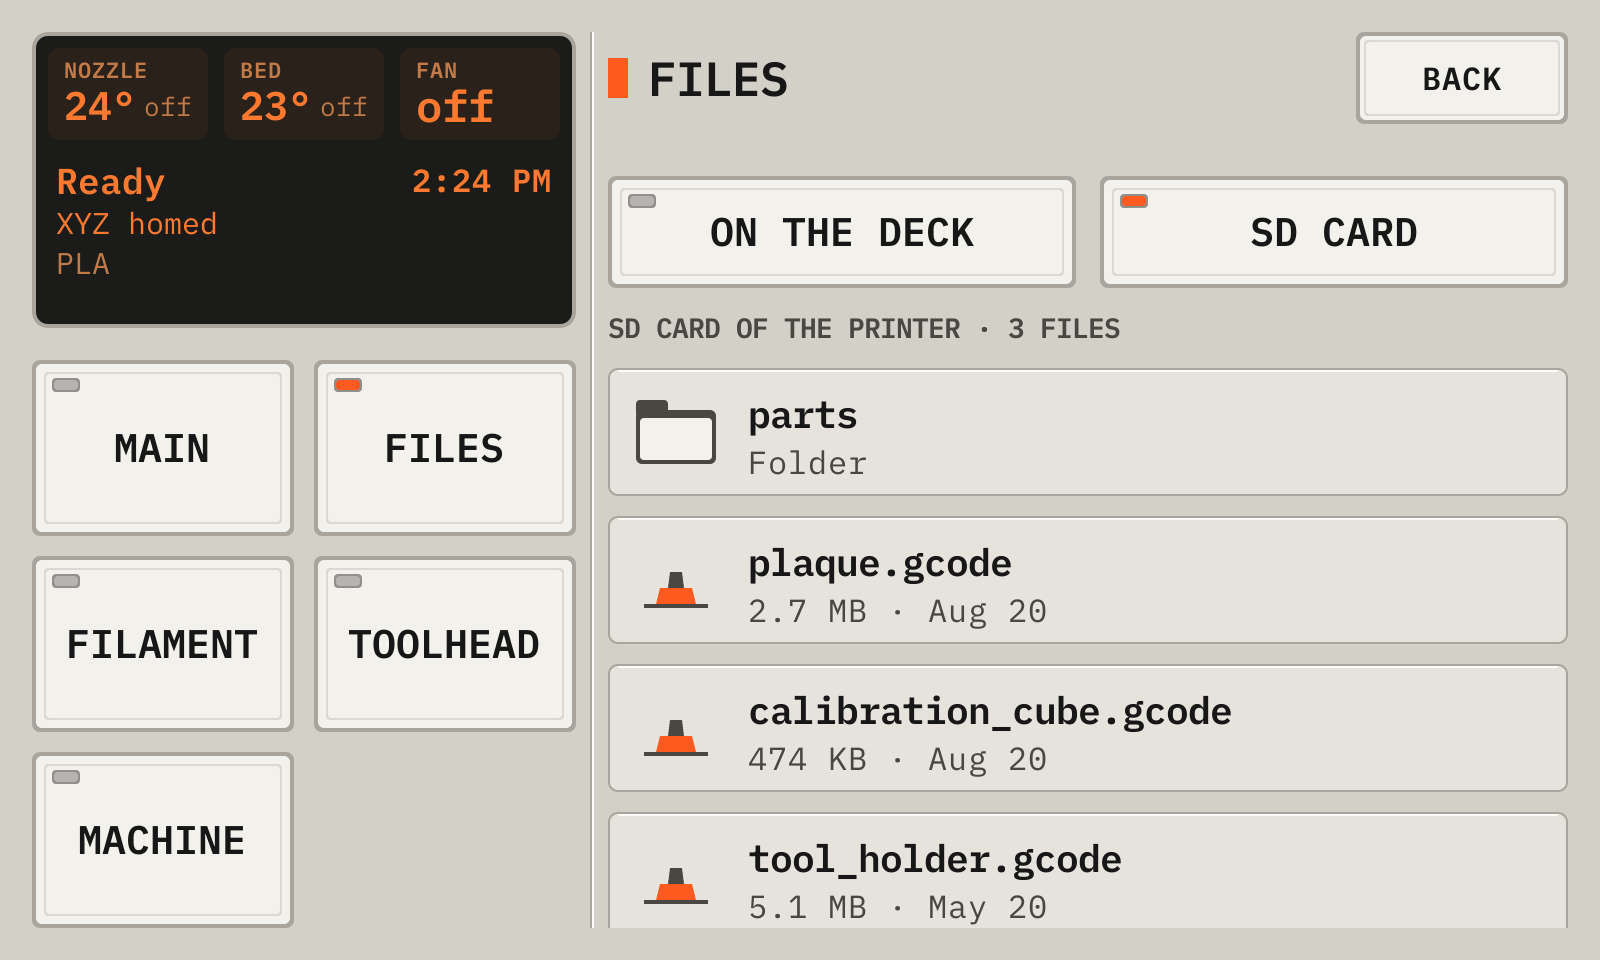
- 1On the deck, SD cardThe files on the card, or on the deck.
- 2CountThe open folder.
- 3FolderTap a folder to open it.
- 4FileTap a file to copy it to the deck.
Stop ends the copy.
09Watch the print
The deck shows a screen for each phase of the print.
- Watch the first layer. Use − and + to set the nozzle height.
- Tap Save to keep the Z offset for the next prints.
- Use Tune to change the speed, the flow or the fan.
- When the print is done, wait for the bed to cool. Then remove the part.
Preparing
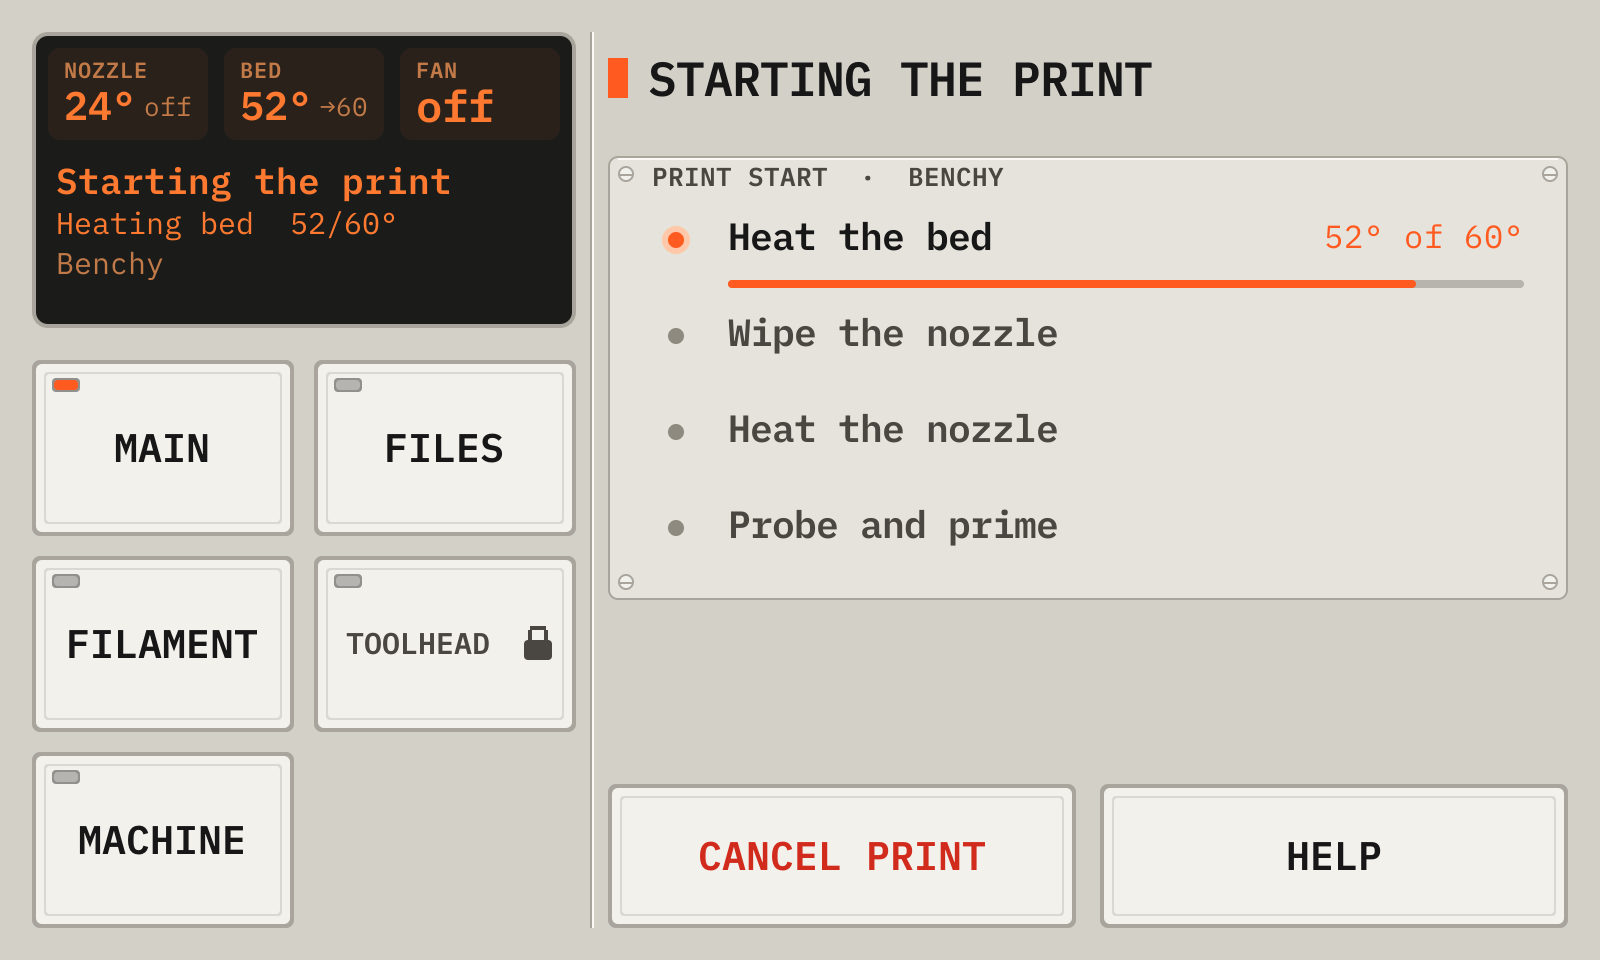
- 1DisplayThe status panel: the nozzle, the bed, the fan, the state of the printer and the details of the print. Tap the nozzle or the bed to set its temperature.
- 2StepsThe steps of the start macro. The step that runs has a lit LED.
- 3HelpThe network, the address and the password.
- 4Cancel printStops the print.
The first layer
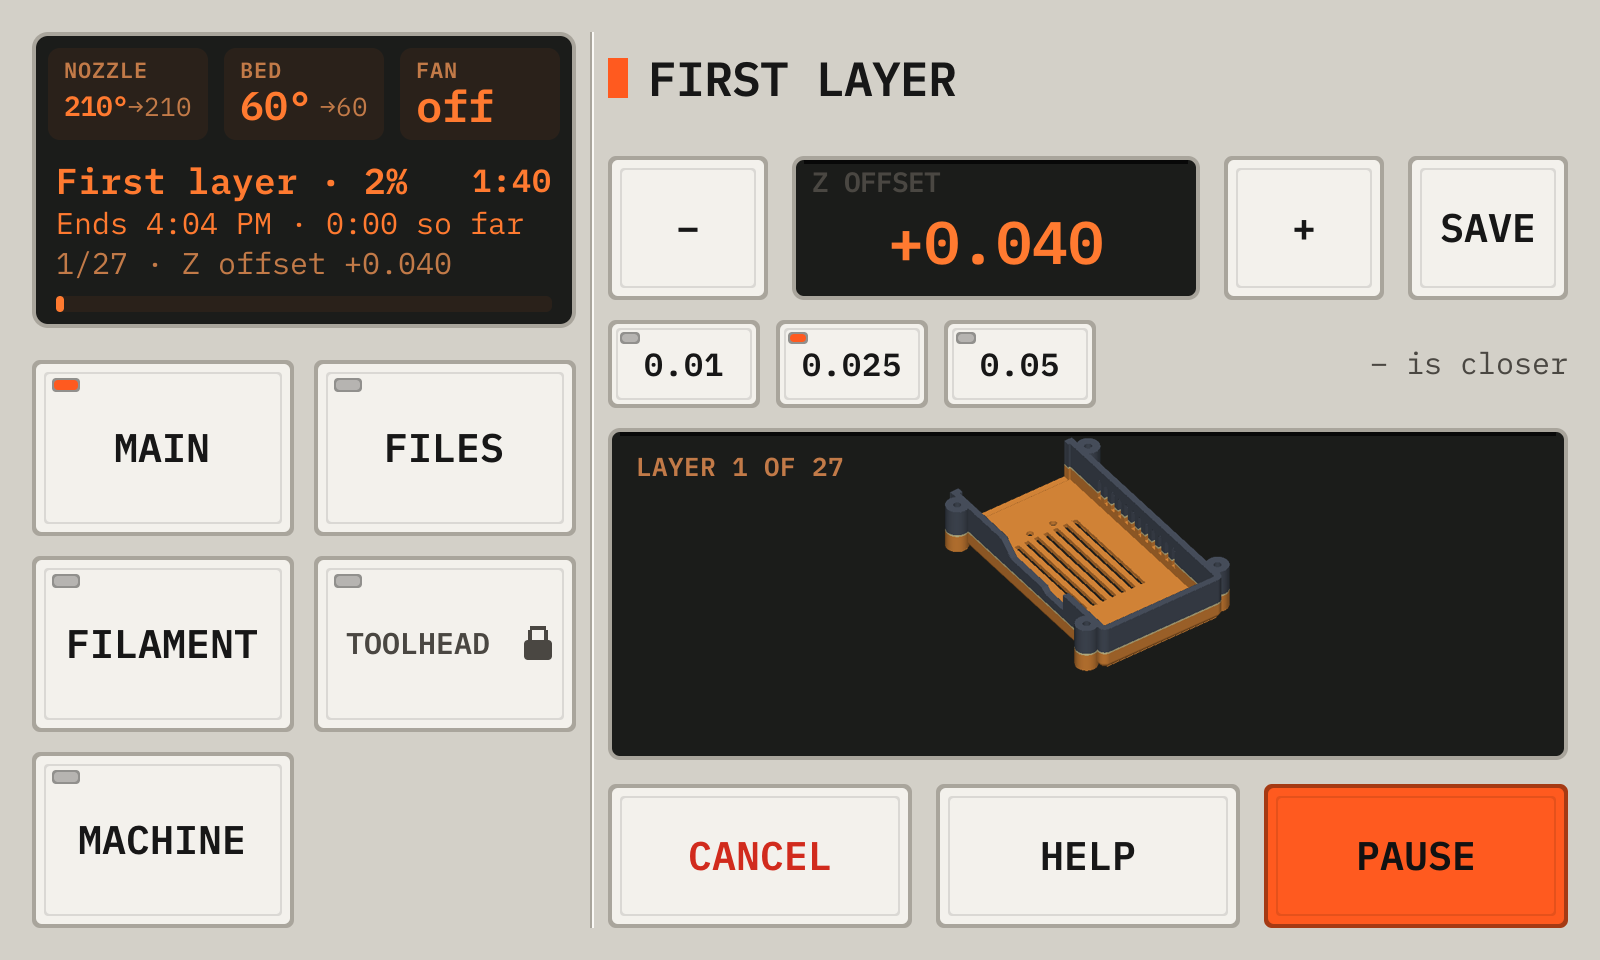
- 1DisplayThe status panel: the nozzle, the bed, the fan, the state of the printer and the details of the print. Tap the nozzle or the bed to set its temperature.
- 2− and +A round, thin line needs − (closer). A flat, rough line needs + (farther).
- 3Z offsetThe nozzle height above its normal height.
- 4SaveKeeps the Z offset for the next prints.
- 5StepHow far one tap moves the nozzle, in mm.
- 6Pause, CancelPauses the print, or stops it after a question.
- 7HelpThe network, the address and the password.
- 8LayerThe first layer of the model.
Printing
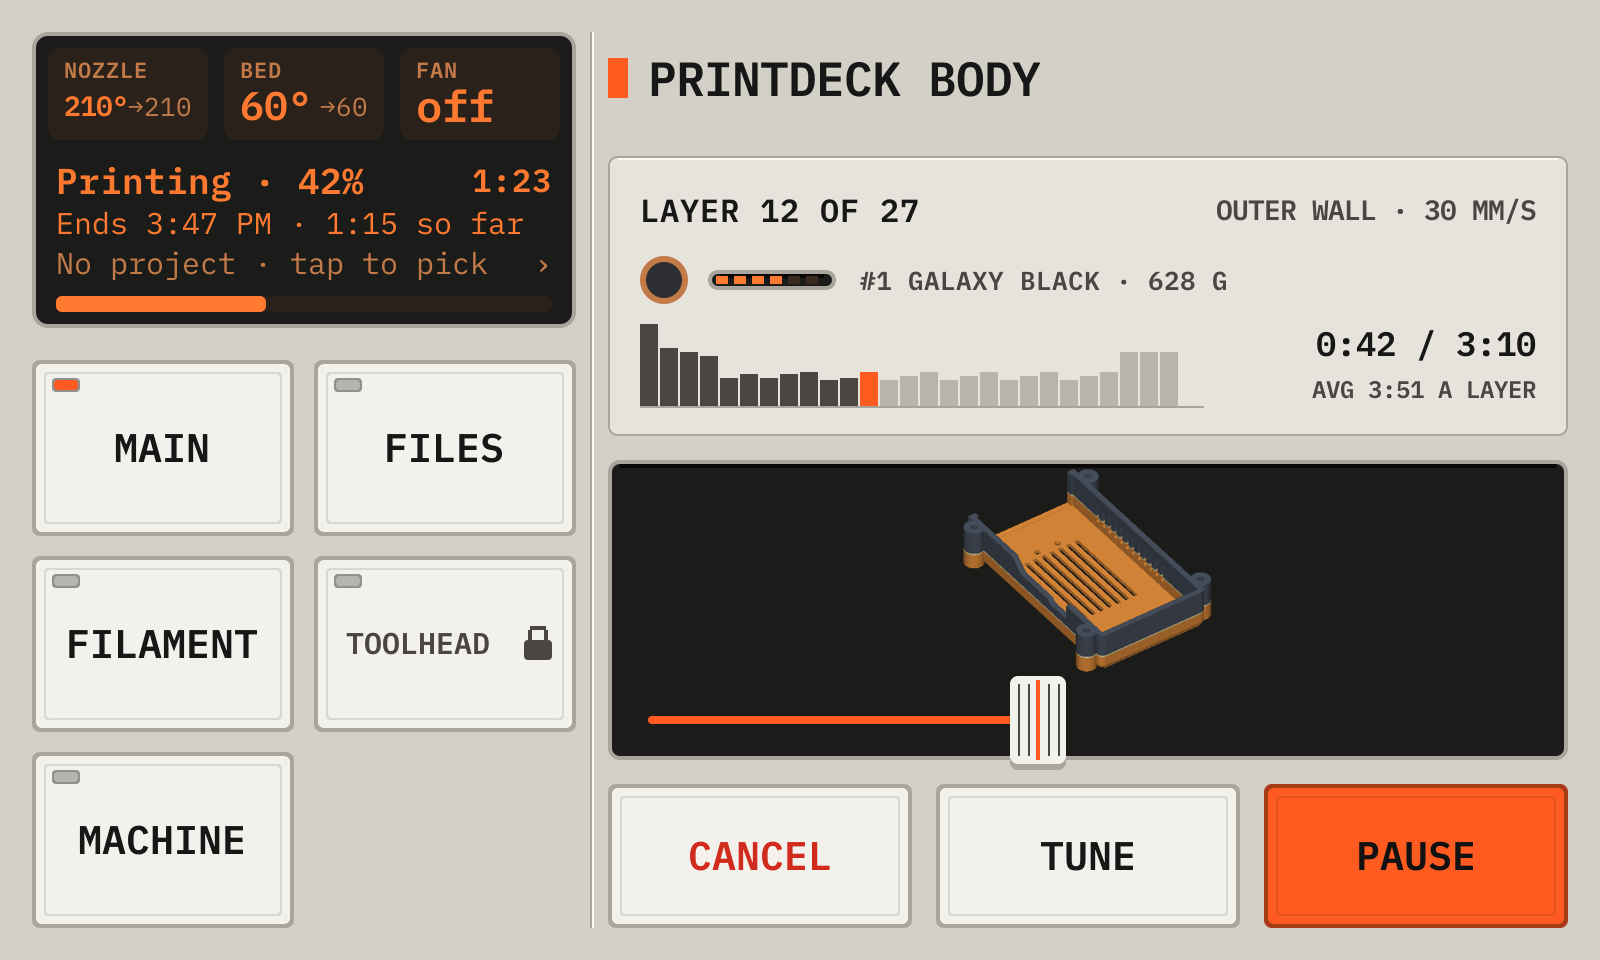
- 1DisplayThe status panel: the nozzle, the bed, the fan, the state of the printer and the details of the print. Tap the nozzle or the bed to set its temperature.
- 2PausePauses the print.
- 3TuneChanges the speed, the flow and the fan.
- 4CancelStops the print.
- 5LayerThe layer now and the head speed.
- 6RollThe roll in the printer and its filament.
- 7Layer timesA bar for each layer. Done layers are dark, the layer now is orange, and the next layers are light.
- 8ModelThe model up to the layer now.
- 9Layer sliderDrag it to see another layer. Live goes back to the layer that prints.
- 10PagesDuring a print, Main goes back to the print.
Tune
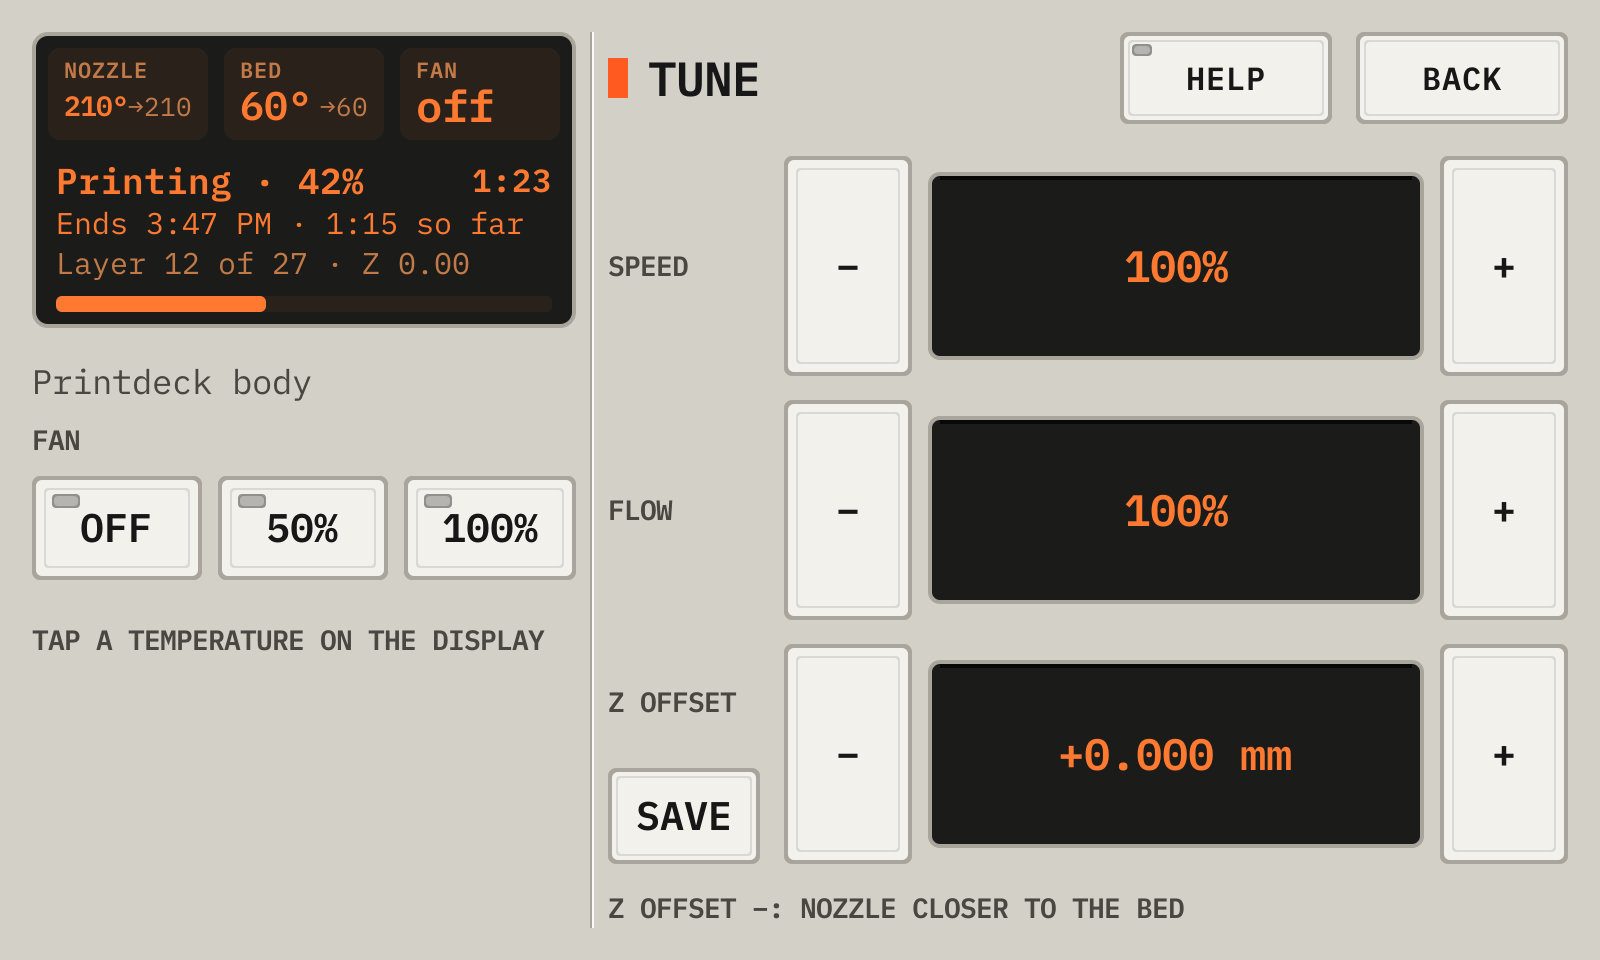
- 1HelpThe network, the address and the password.
- 2SpeedThe print speed, in percent of the slicer speed.
- 3FlowThe amount of plastic, in percent.
- 4Z offsetThe nozzle height above its normal height. Save keeps it.
- 5FanThe part cooling fan.
- 6DisplayTap the nozzle or the bed on the display to change its temperature.
Paused
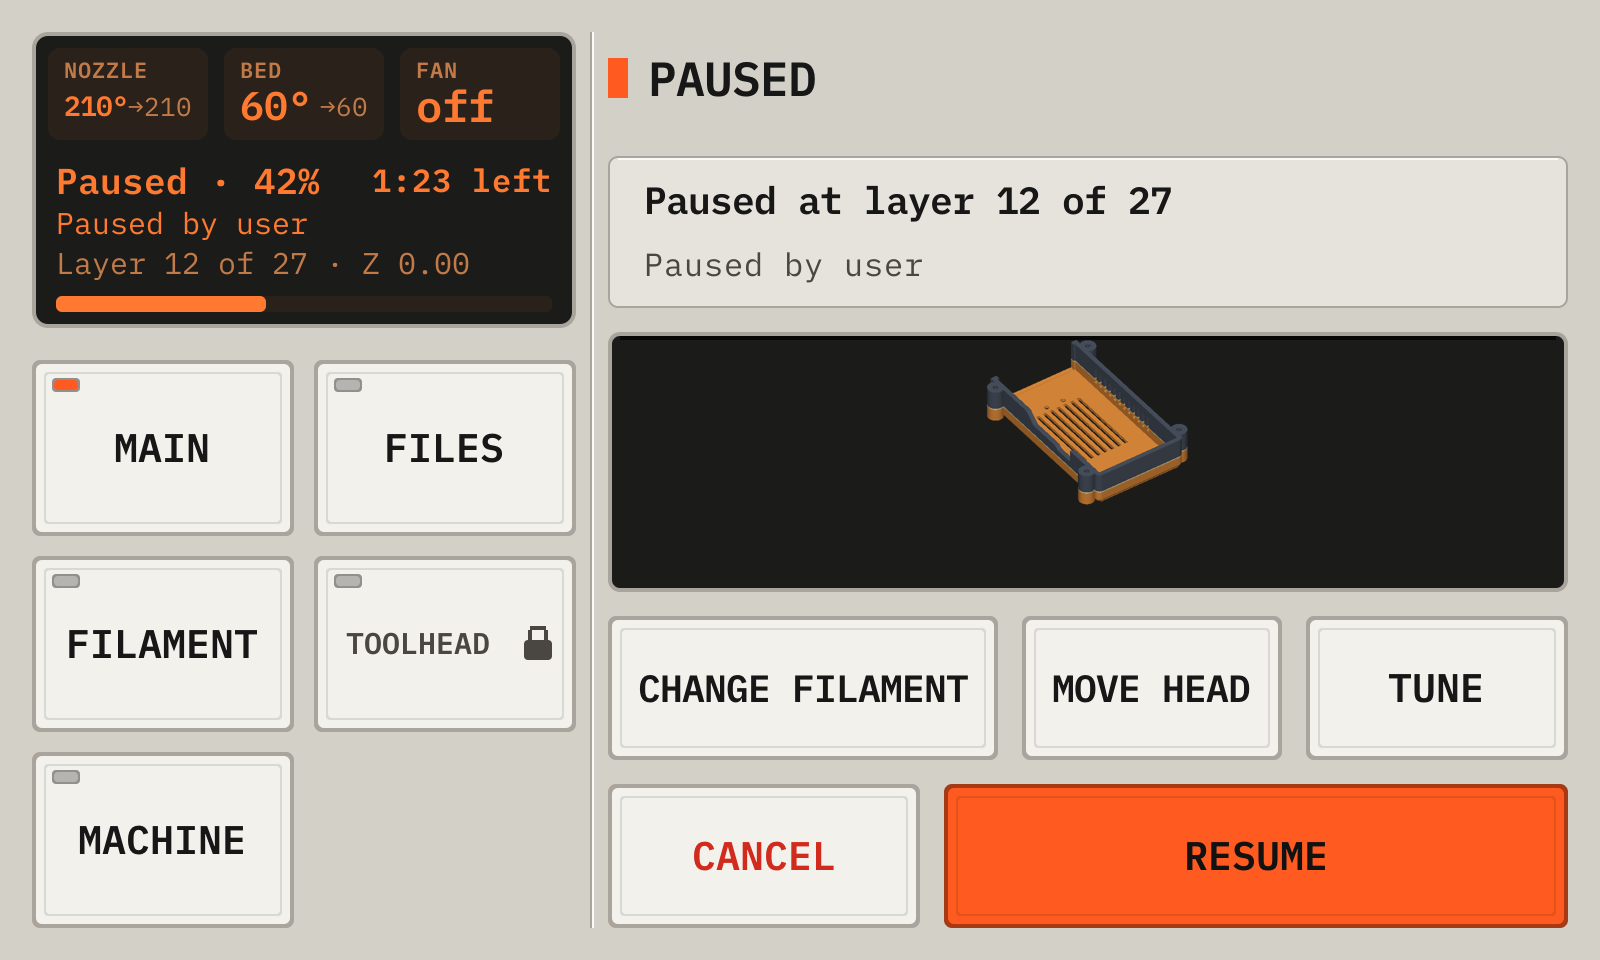
- 1DisplayThe status panel: the nozzle, the bed, the fan, the state of the printer and the details of the print. Tap the nozzle or the bed to set its temperature.
- 2WhereThe layer and the message.
- 3ResumeContinues the print.
- 4Change filamentFor a new color.
- 5Move headOpens Toolhead.
- 6TuneChanges the print.
- 7CancelStops the print.
A pause of the file
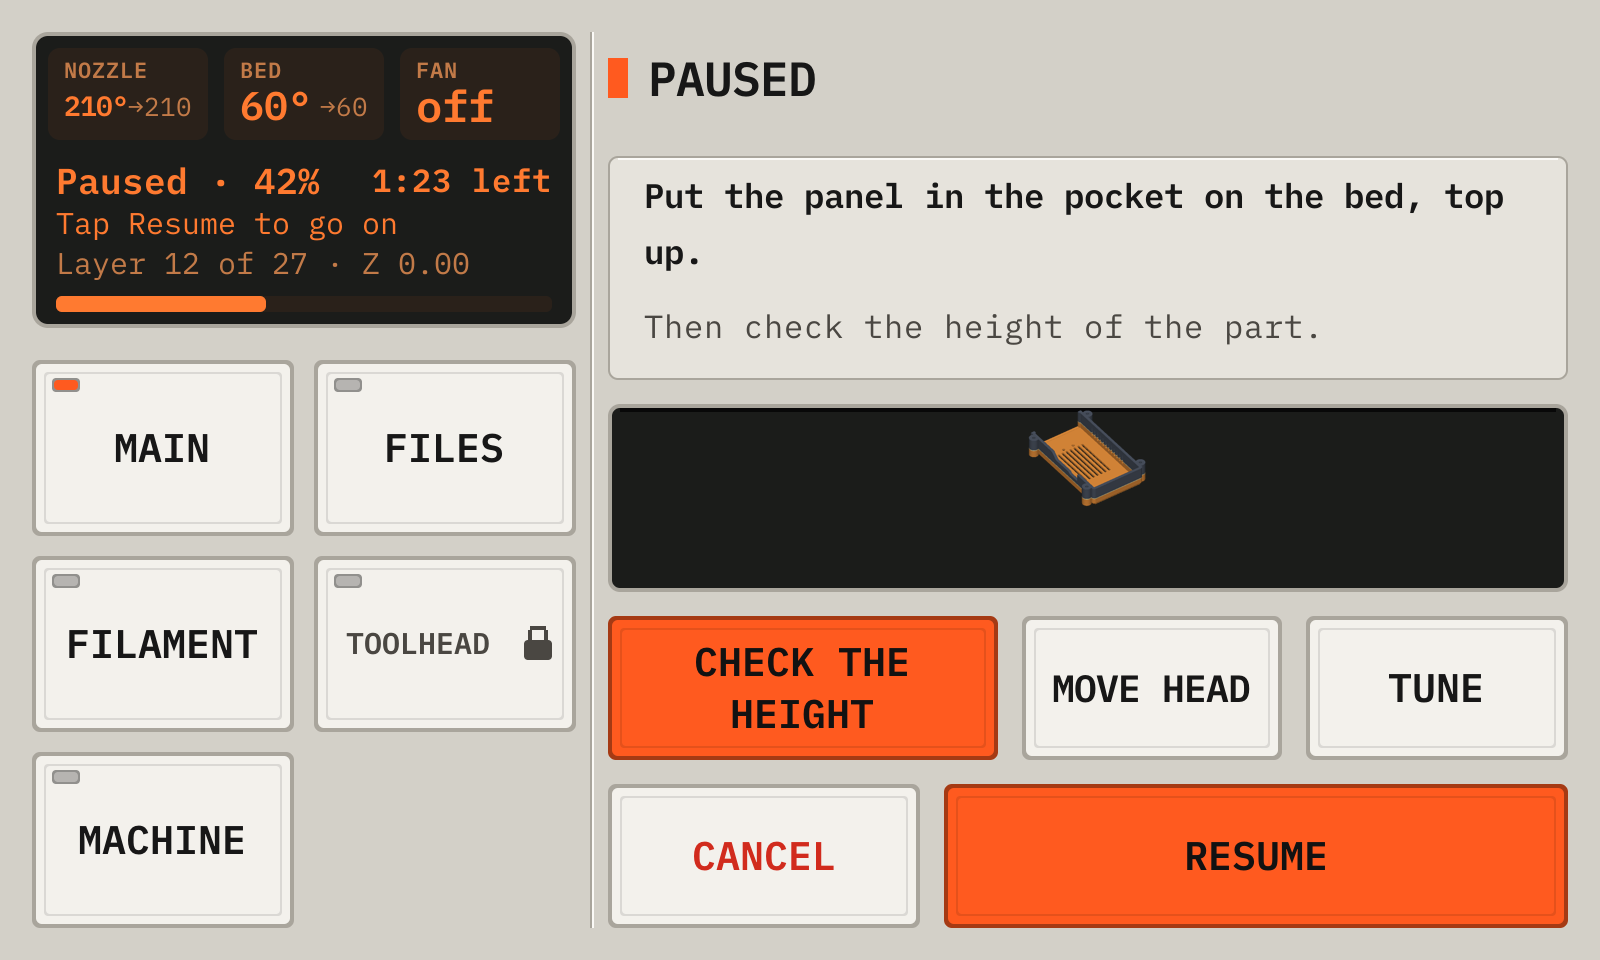
- 1WhereThe message of the file.
- 2Check the heightA paper test on the part.
- 3ResumePrimes the nozzle and continues.
The end of the print
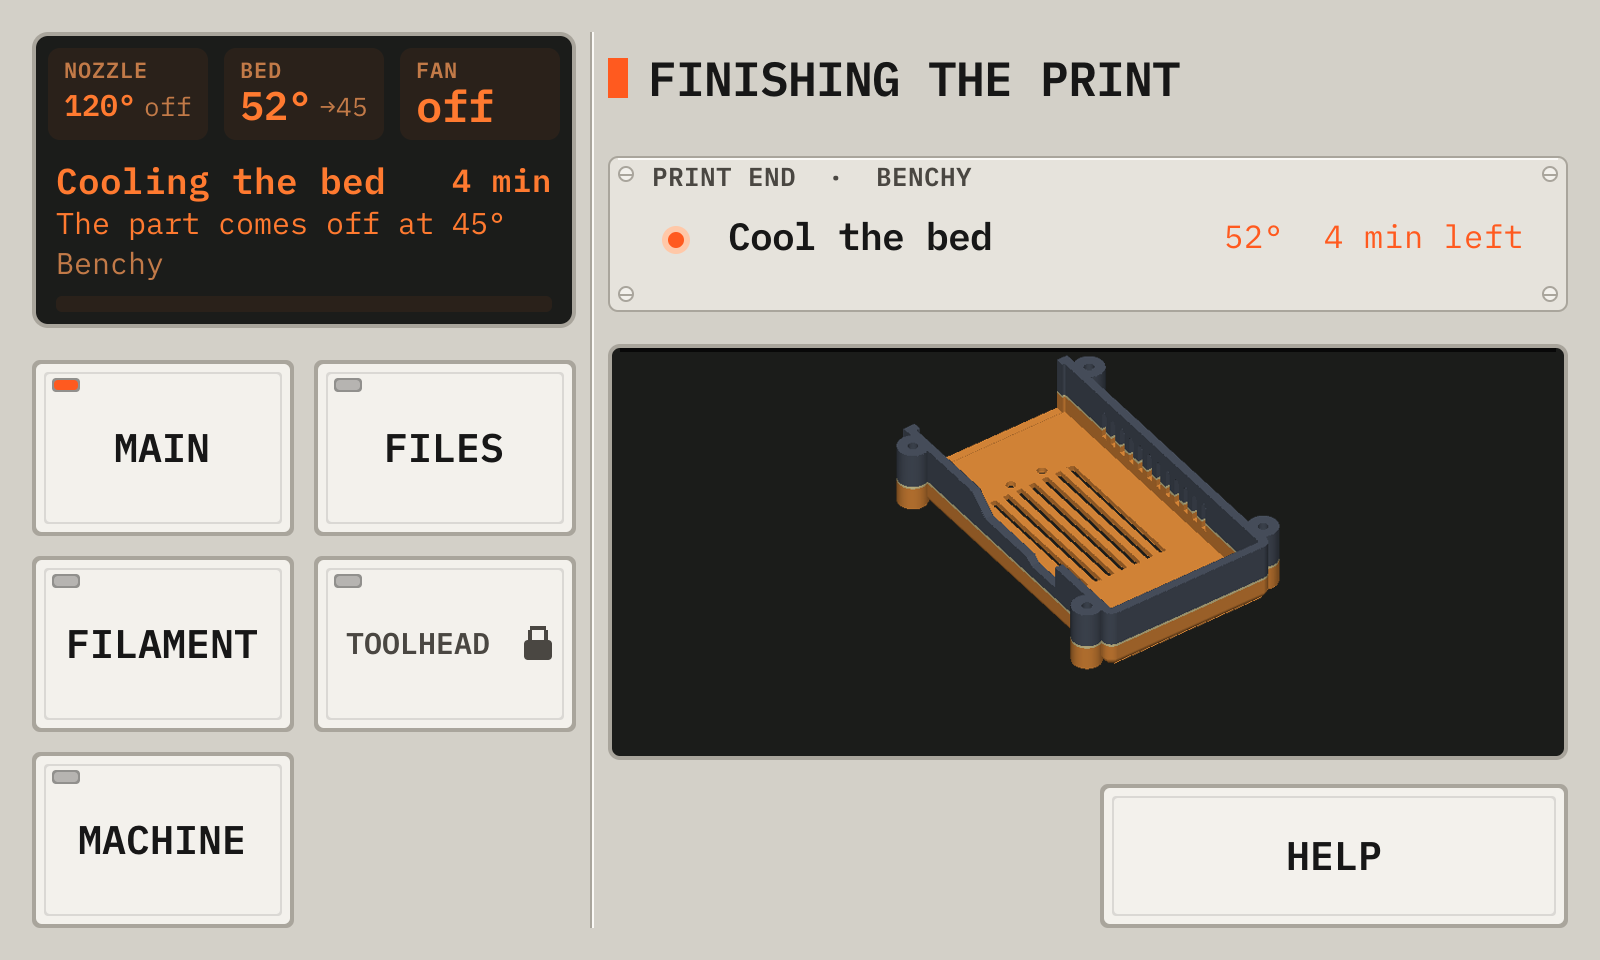
- 1StepsThe steps of the end macro.
- 2ModelThe finished model.
Done
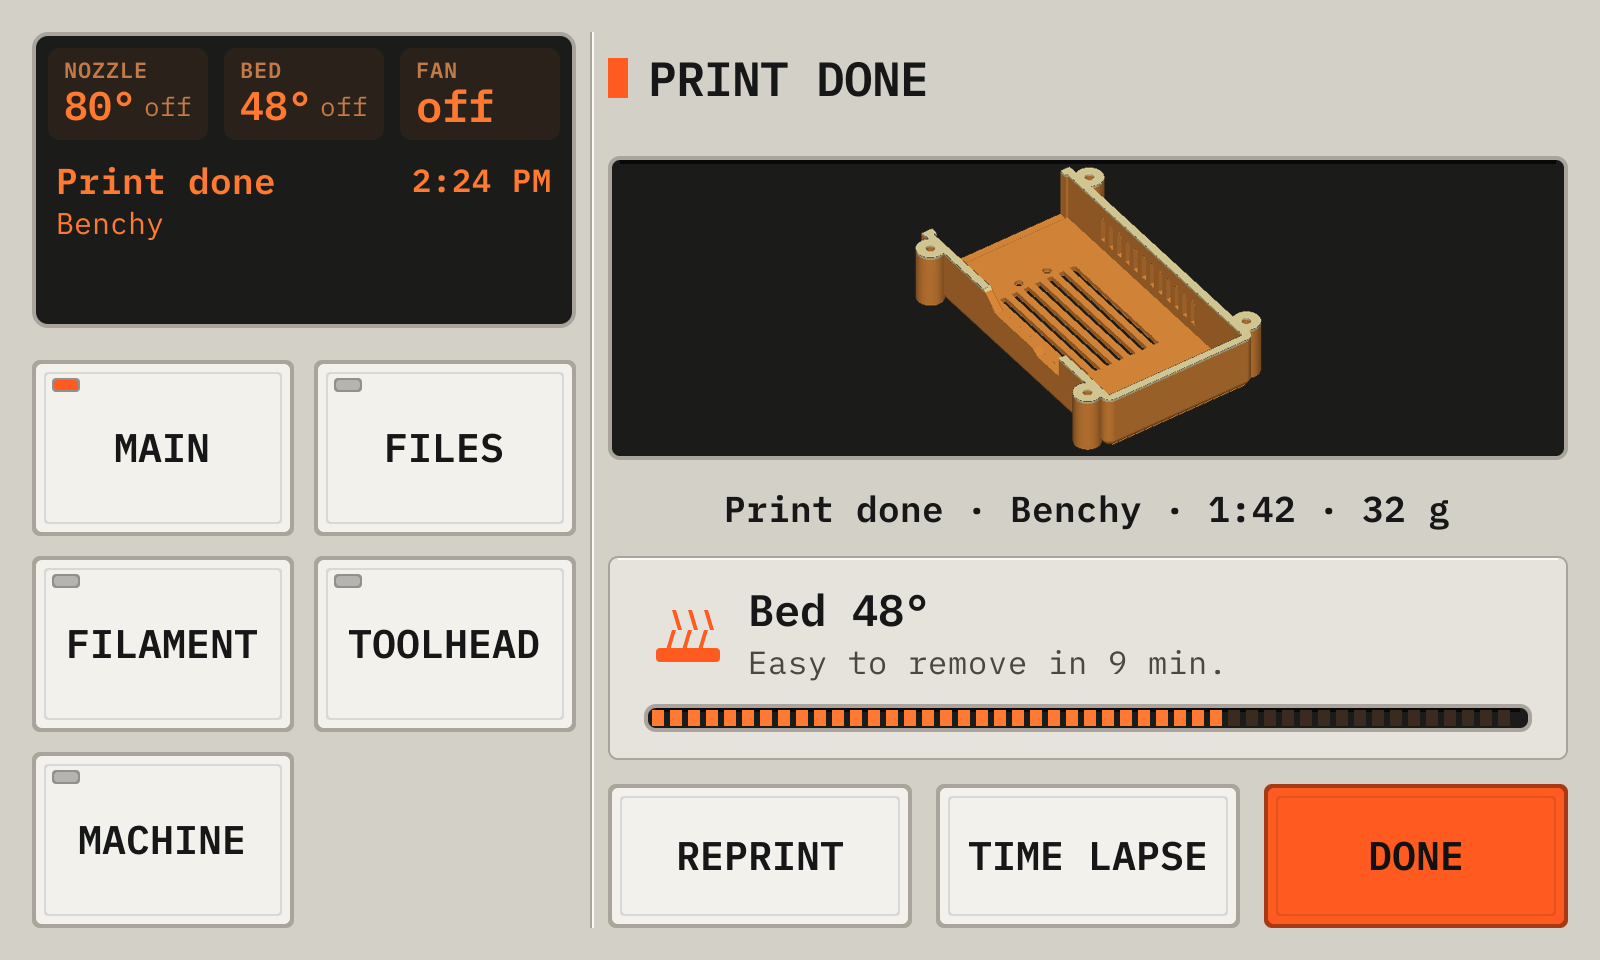
- 1ModelThe model of the print.
- 2ResultDone, Cancelled or Failed.
- 3BedThe time until the part comes off easily (35°).
- 4ReprintPrints the file again.
- 5Time lapsePlays the time lapse video of the print. It shows Saving… while the deck writes the video.
- 6DoneCloses this screen.
Time lapse shows only for a print with a time lapse.
10Print in two colors
The Colors tool of the Cura plugin gives a model a roll of another color. The print pauses at the first layer of that model.
- In Cura, put the letters on the part. Select the letters, open the Colors tool, and tap their roll.
- Print. At the first layer of the letters, the printer parks and the deck shows Change filament in orange.
- Tap Change filament. Unload, load the roll of the letters, and tap Done.
- Pull the ooze off the nozzle with tweezers, then tap Resume.
A color change
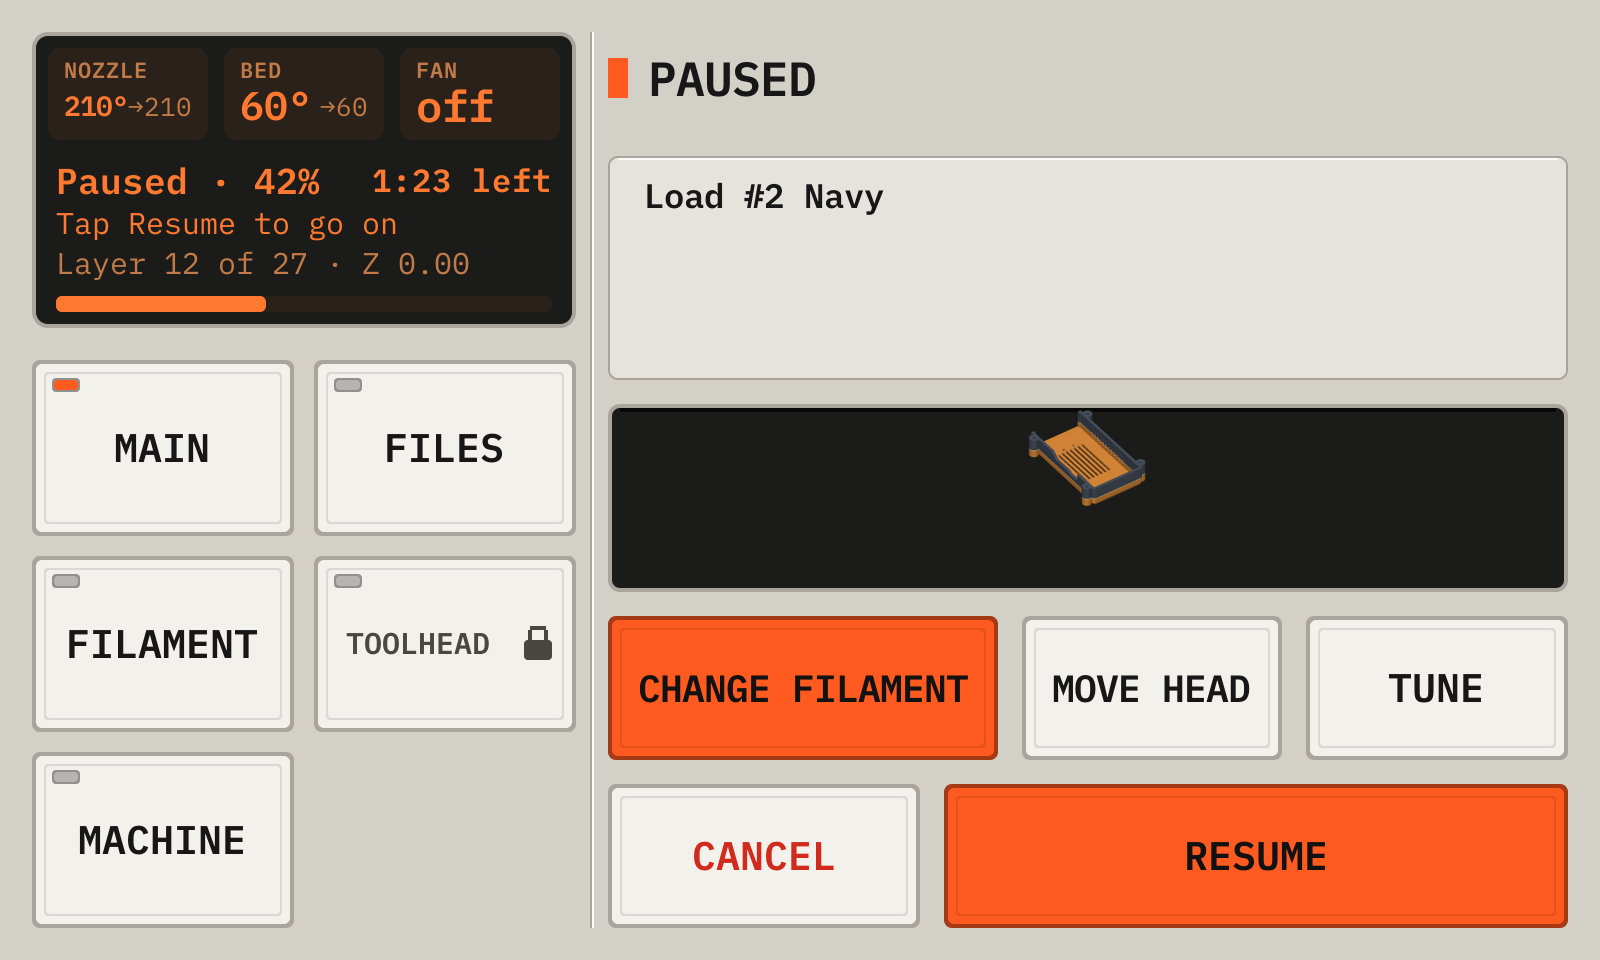
- 1WhereThe roll of the next color.
- 2Change filamentOpens the filament change with that roll.
- 3ResumePrimes the nozzle at the front of the bed, then continues.
11Look around during a print
During a print, the other screens are read only. The deck goes back to the print after 2 minutes with no touch.
During a print, Main is the print. The key panel opens the other pages.
Filament during a print
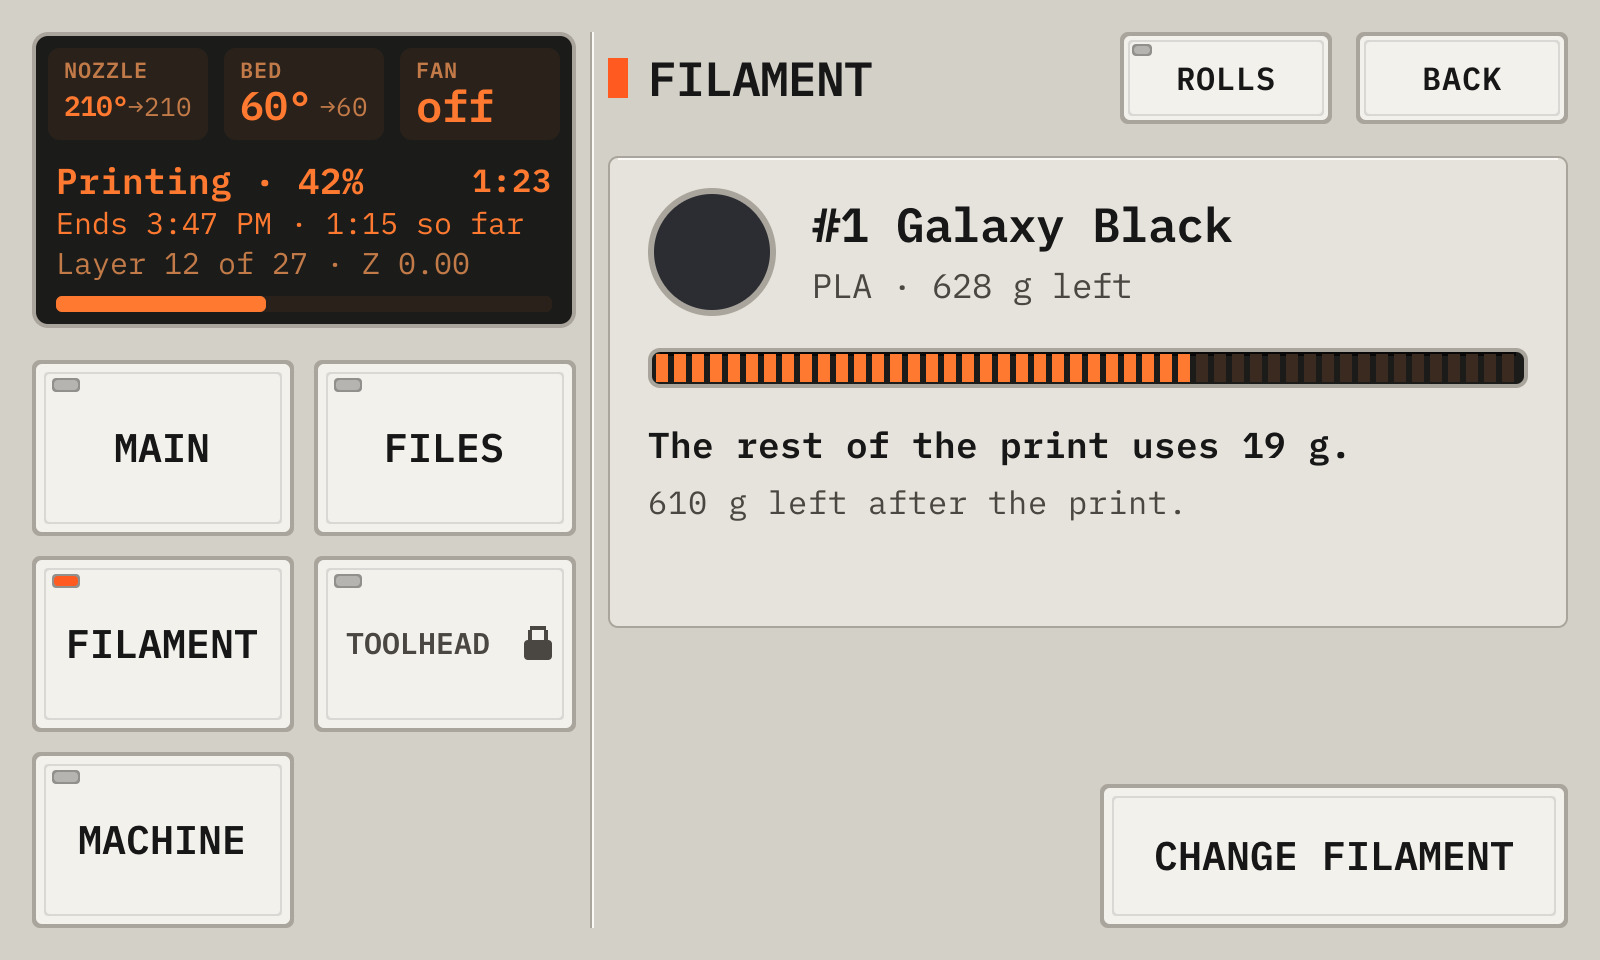
- 1RollThe roll in the printer and its filament.
- 2LastsThe filament left after the print. Red text shows a roll that runs out.
- 3Change filamentPauses the print and opens the filament change. Then tap Resume.
- 4PagesThe key panel opens each page.
12Make a time lapse
The deck camera captures a picture at each layer change. At the end of the print, the deck makes a video.
For each picture, the printer retracts, lifts the nozzle and moves the head to the left side. A bed that moves in Y goes to the middle of the part, so the bed is at the same place in each frame. On the TAZ Workhorse the nozzle goes to Z 10 mm or more, over the bed washers. Each picture adds a few seconds.
- Aim the camera: Settings, then Camera.
- Open Settings, then Time lapse.
- Check Time lapse at the top of the page to turn it on.
- With two cameras, open Settings, then Cameras. Tap a camera, and check Time lapse or Pictures.
- Tap First layer, and choose a picture of the first layer, or a picture and a pause. At a pause, check the layer, then tap Resume.
- Print. After the first layer, the deck shows its picture.
- At the end of the print, tap Time lapse on the done screen. The video plays.
- To see it later, open Machine, then Statistics, then History. Tap the print, then Play.
- To download the video, open http://printdeck.local/system in a browser. The Time lapse part has the video. Click its name.
A print of the history
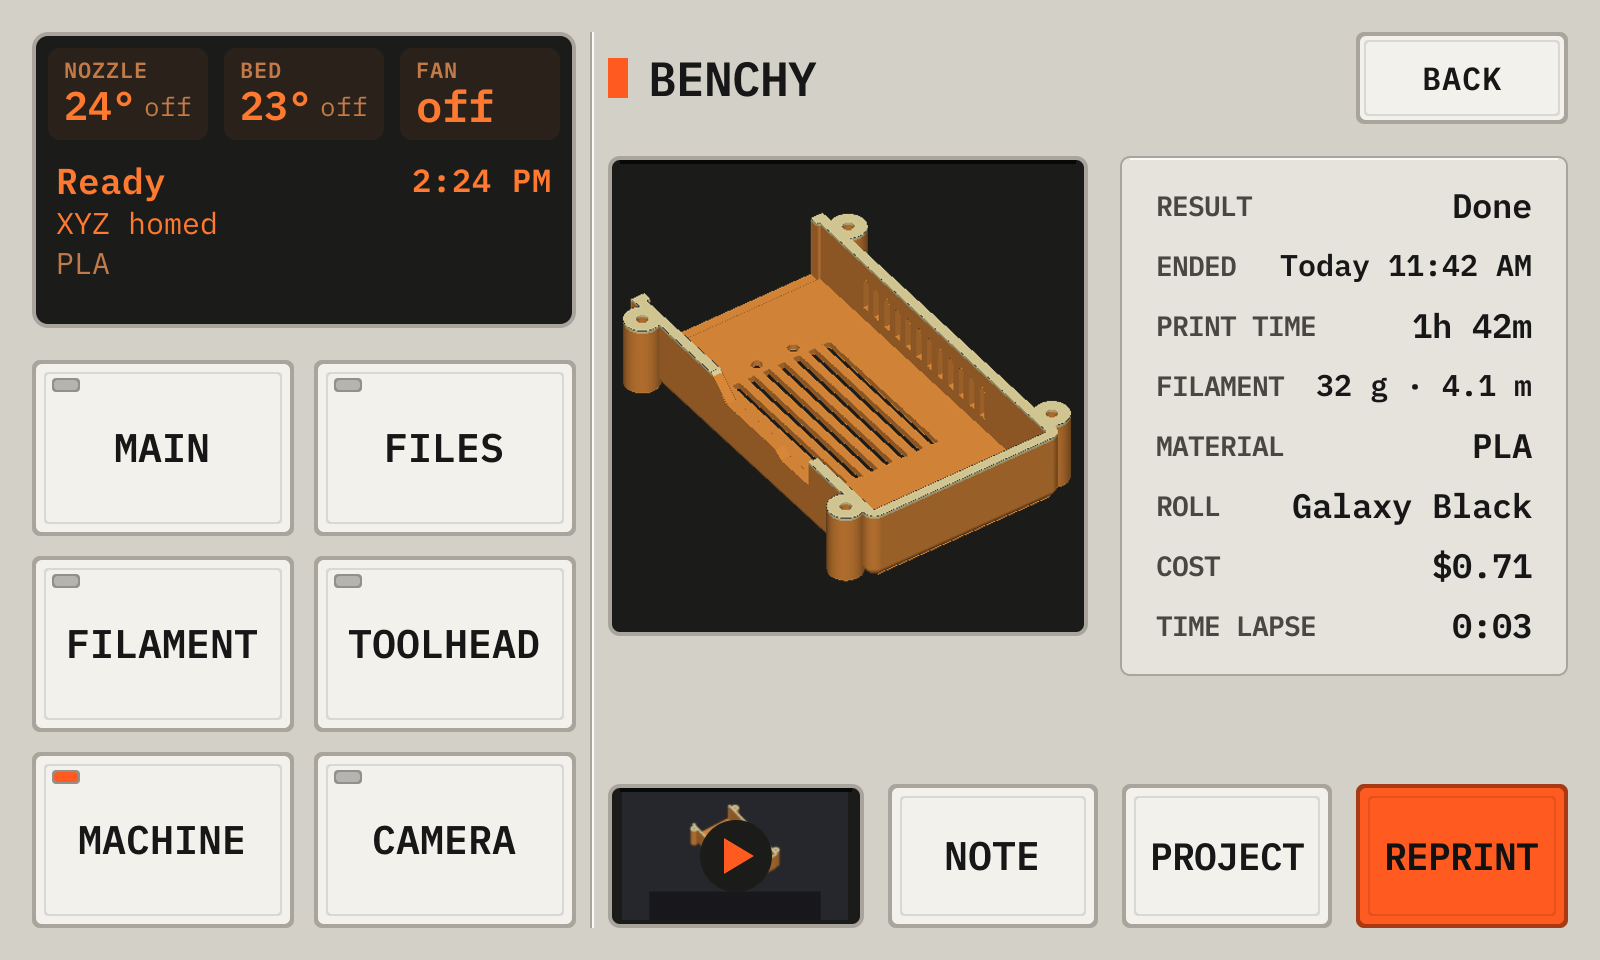
- 1ModelThe model of the print.
- 2DetailsThe result, the time, the filament and the time lapse video.
- 3StillThe last frame of the time lapse video.
- 4PlayOpens the player.
- 5ReprintPrints the file again.
The deck keeps the last 3 videos. The record of an older print shows Removed.
The time lapse player
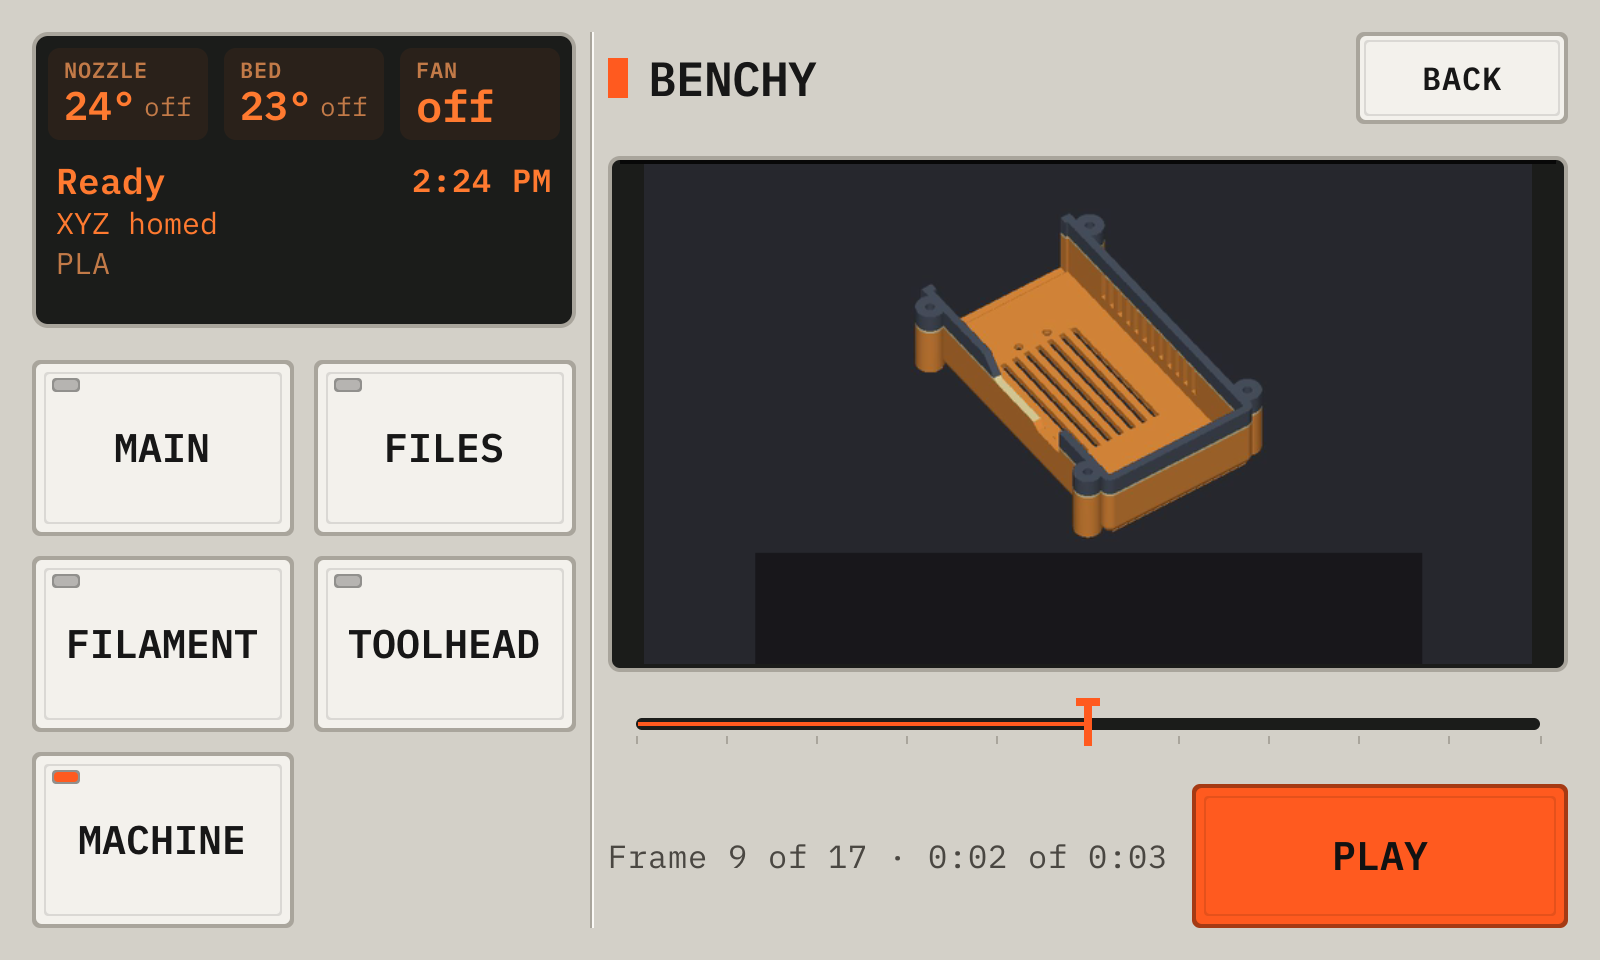
- 1VideoThe video, as large as it fits.
- 2PositionTap or drag to go to a frame.
- 3FramesThe frame, the count of frames, the time and the length.
- 4PlayPlays the video, or pauses it.
The video plays only while this page shows. Back returns to the page that opened it.
Cura, PrusaSlicer and OrcaSlicer write the layer comments that the time lapse needs.
Park for the frames is on by default. Off keeps the toolhead in the pictures, with no stops.
Crop to the part is on by default. With a calibration of the camera (Settings, Camera, Calibrate) and the park on, each frame shows the whole plate and the part on it, in the shape of the camera picture. With no calibration or no park, the frames show the whole picture.
The video is a .mov file. The deck keeps the last 3 videos. A backup excludes the videos.
From the manual for a wide display. The deck draws every picture.